这是对之前摸索的lnmp搭建流程的精简:
虽说是精简,但是文章还是有数万字的,请参看右侧目录点击导航需要的内容---->>>
一、初次登录安全设置
登录成功后,如果没开启密钥登陆的,本地用xshell生成密钥配对向导生成一对,公钥导出保存好,私钥自己更是要藏好了以免泄露cd .ssh 文件夹下,ls看看是否有authorized_keys文件
没有相关文件夹和文件的话 mkdir,touch创建一下,并且记得sshd_config配置里面将key目录修改一致。(一般来说centos7不存在没有此路径的情况,默认配置证书路径应该也是统一的)alt+ctrl+f 组合键打开sftp,上传本地的公钥.pub文件到 .ssh文件夹下,ls一下确保成功上传,然后写入公钥文件内容到authorized_keys文件内:
cat id_rsa_2048.pub >> /root/.ssh/authorized_keys.pub公钥文件名请自行核对
公钥上传完毕,修改sshd配置:
vi /etc/ssh/sshd_config主要两点:
1.关闭密码登录:PasswordAuthentication no
或者使用查找替换指令直接修改:
sed -i "s/^PasswordAuthentication.*/PasswordAuthentication no/g" /etc/ssh/sshd_config2.检查公钥文件路径:AuthorizedKeysFile .ssh/authorized_keys
就是这么简单,别的无关操作,比如关闭root登录(PermitRootLogin no),开启PubkeyAuthentication yes都不用管,没影响的
然后 systemctl restart sshd ,新开一个访问测试是否ok
二、lnmp配置环境安装流程
1.安装Screen和Rclone
首先第三方epel源还有fuse等依赖都先安一遍,为了更舒适的安装体验:yum -y install epel-release
安装Screen等基本工具yum -y install wget unzip zip screen fuse fuse-devel
然后安装rclone,方便之后拉取备份网站数据:
wget https://downloads.rclone.org/rclone-current-linux-amd64.zip
unzip rclone-current-linux-amd64.zip
chmod 0755 ./rclone-*/rclone
cp ./rclone-*/rclone /usr/bin/
rm -rf ./rclone-*安好后开启Screen并运行rclone配置:screen -S installrclone config
将你的网盘授权一下,参考文章:
附送一些基础的screen操作指令:
几个常用操作熟练即可
screen -ls显示所有创建的桌面,未连接的桌面都显示Detached screen -r+桌面ID或者完整桌面名字 即可进入之前创建的对应ID桌面,再screen -ls就可以显示attached连接中了 在桌面链接中想退出当前桌面?按住 Ctrl +a+d即按着ctrl不放,再依次按一下a和d,就可以退出当前桌面了 screen -S 对应ID -X -quit强制关闭对应screen,ctrl+c通用停止当前指令操作
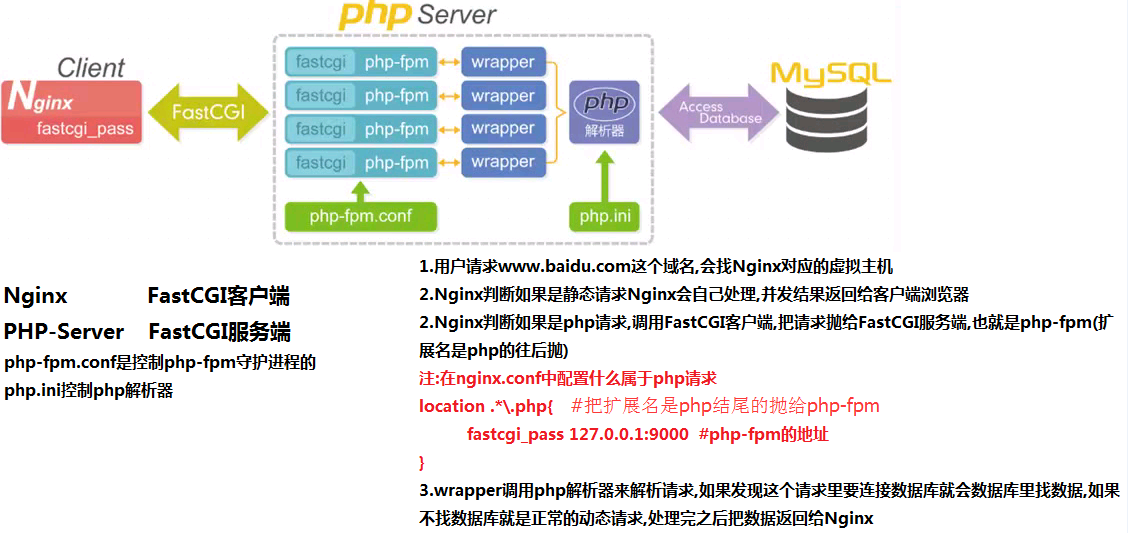
2.lnmp工作原理

检查是否有添加了 FedoraProject 的 epel 源,之前我们已经安装
如果系统默认没有加入这个源,加入的方法很简单:
yum install epel-release安装完成后执行
yum update3.nginx的安装
这里通过直接添加官方源后 yum 方式安装nginx。
添加nginx源文件配置 touch /etc/yum.repos.d/nginx.repo,编辑添加以下内容
vi /etc/yum.repos.d/nginx.repo

[nginx]

name=nginx repo

baseurl=http://nginx.org/packages/centos/7/$basearch/

gpgcheck=0

enabled=1
(以上适用于 CentOS 7, 其他版本可以看官网说明)
nginx官方源地址
yum list |grep nginx查询下配置源是否成功
然后安装 nginx执行:
yum -y install nginxnginx启动并加入自启动:
systemctl start nginx
systemctl enable nginx
systemctl status nginx查看下运行状态free -m查看下内存占用
这时候你的web服务就上线了,打开浏览器输入ip
即可看到nginx欢迎页面
如果没有,那就是你的vps默认开启防火墙了,先查看下吧:
firewall-cmd --state我们添加http,https建站服务即可:
firewall-cmd --permanent --add-service=http
firewall-cmd --permanent --add-service=https
再查看下就ok了
firewall-cmd --reload
firewall-cmd --list-all
如果firewalld无法启动尝试重启下dbus服务:
systemctl restart dbus4.安装 Mysql(MariaDB)
CentOS7 官方源中把 mysql 换成了 MariaDB,
因此我们这里以 MariaDB 代替 Mysql,首先执行安装:
yum install mariadb-server安装完成后启动 MariaDB 并设置为开机启动:
systemctl start mariadb
systemctl enable mariadb
执行脚本通过交互的方式对 MariaDB 进行一些设置:
/usr/bin/mysql_secure_installation一般来说全默认即可,每条设置内容大致说一下:
默认root用户访问第一次是留空密码;
提示是否设置密码,当然设置一个了,弄个复杂点的,自己小本本记录好;
root用户禁止远程访问,我们在后面将设置新的专用远程访问账号就好;
还有开放相关firewalld端口设置,如果需要外网访问数据库,就开启对应端口,防止3306之类的端口无法访问。
5.安装php和相关扩展
我们可以使用 yum 同样方便的安装 php-fpm,这里同时安装 php-mysql 扩展用于连接 mysql 数据库,如果你的 php 应用中需要用到更多的扩展,也可以在这里一并安装
附带安装一些必要的扩展
yum -y install php php-fpm php-mysql php-gd php-ldap php-odbc php-pear php-xml php-xmlrpc php-mbstring php-snmp php-soap curl curl-devel以上就附带安装 PHP(php-fpm) 了
简单点,只安装下面2个也行:
yum install php-fpm php-mysql这里主要说下,如何安装php7.0以上版本:
- 清除历史版本
为了防止CentOS上面发生php冲突,所以,这个命令还是先执行一下更好些。
yum -y remove php*- 安装源
安装php72w,是需要配置额外的yum源地址的,否则会报错不能找到相关软件包。
php高版本的yum源地址,有两部分,其中一部分是epel-release,另外一部分来自webtatic。如果之前跳过epel-release源的话,安装webtatic的时候,会有错误抛出。
所以,这里再次提醒下,对应的源地址导入命令是:
rpm -Uvh https://dl.Fedoraproject.org/pub/epel/7/x86_64/Packages/e/epel-release-7-12.noarch.rpm
rpm -Uvh https://mirror.webtatic.com/yum/el7/webtatic-release.rpm
当然,您也可以选择之前的epel源安装命令,也是一样的效果:
yum install epel-release -y
rpm -Uvh https://mirror.webtatic.com/yum/el7/webtatic-release.rpm- 安装扩展包
事实上,这里面的对应扩展库很多,这里大家一定要注意cli和fpm mysqlnd这几个包,而其它的相关包就看您需要了。
yum -y install php72w php72w-cli php72w-fpm php72w-common php72w-devel php72w-mysqlnd还有比较豪华的版本:
yum -y install php72w php72w-cli php72w-fpm php72w-common php72w-devel php72w-embedded php72w-gd php72w-mbstring php72w-mysqlnd php72w-opcache php72w-pdo php72w-xml- 安装完成以后,启动服务并加入自启动
systemctl start php-fpm.service
systemctl enable php-fpm.service
php-fpm的由来,nginx和php通信2种模式比较,参考:
https://blog.csdn.net/QFire/article/details/78680717?locationNum=1&fps=1
2020.11.18更新:
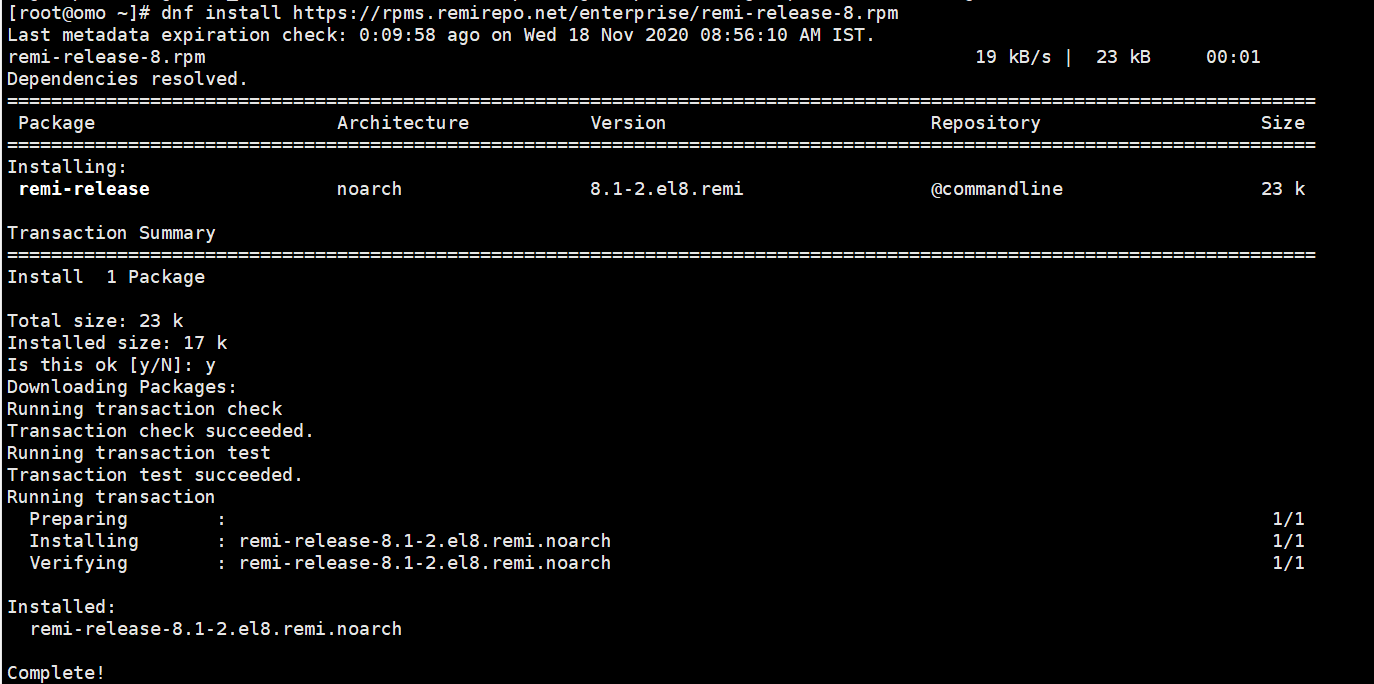
如果使用centos8系统 要安装php7.0以上版本,推荐使用dnf包管理器来替换rpm,我们添加remi源:
dnf install https://rpms.remirepo.net/enterprise/remi-release-8.rpm
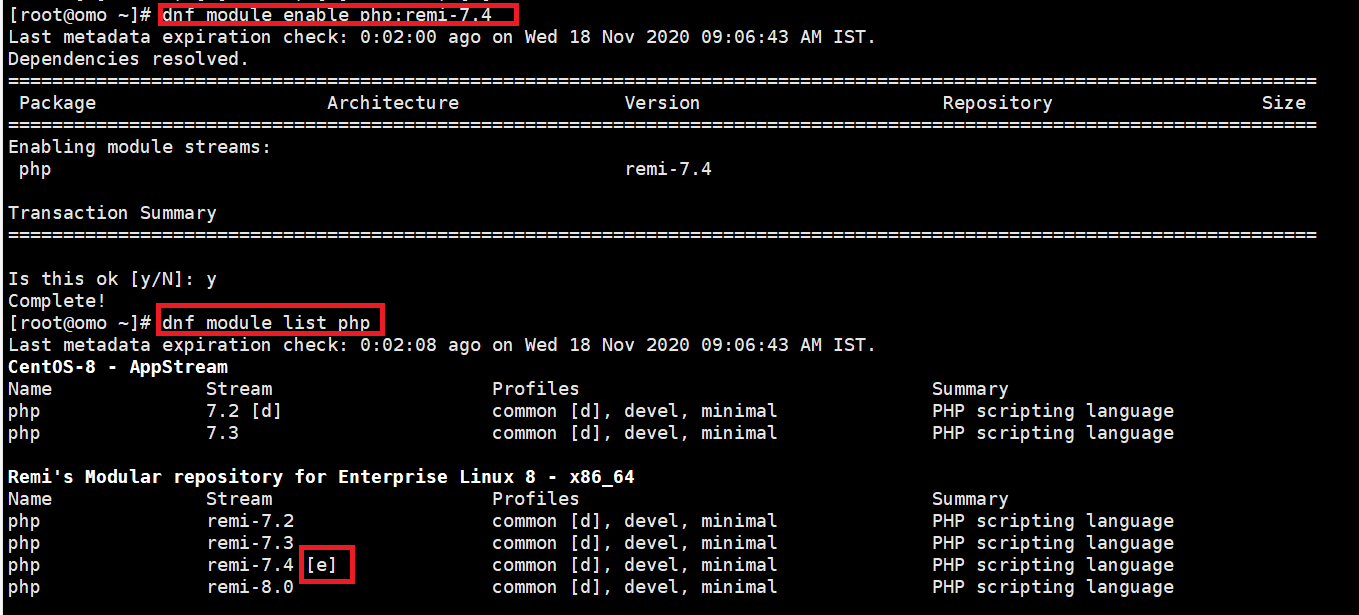
查看最新包含的php模块,没错,现在使用模块管理包了
dnf module list php
可以看到包括php7.0-8.0一些版本选择,这里安装7.4
dnf module enable php:remi-7.4
我们安装普通套件+自选的一些模块,mysqlnd是必须的,当然,你也可以选择自己需要的组合,或者默认的开发套件和最小化安装
dnf install php php-cli php-common php-devel php-embedded php-gd php-mbstring php-mysqlnd php-opcache php-pdo php-xml最后启动服务,添加开机自启:
systemctl enable php-fpm.service
systemctl start php-fpm.service- php配置的一些安全设置
vi /etc/php.ini修改php默认配置:cgi.fix_pathinfo=0
你在命令模式下敲斜杆( / )这时在状态栏(也就是屏幕左下脚)就出现了 “/”
然后输入你要查找的关键字 cgi.fix_pathinfo=敲回车(Enter键)就可以了。
如果你要继续查找此关键字,敲字符 n 就可以继续向下查找了。
敲字符N(大写N)就会返回向上查询
为了方便后面修改上传附件大小,提前修改下相关网站配置(如果你只是挂个空页面,保持php默认配置即可):
upload_max_filesize = 8000M;
post_max_size = 8000M;
max_execution_time=600;
修改php-fpm配置
vi /etc/php-fpm.d/www.conf先展示下需要修改的列表清单:
listen= /var/run/php-fpm/php-fpm.sock
listen.owner = nginx
listen.group = nginx
listen.mode = 0666
user = nginx
group = nginx
pm = dynamic 生成动态进程
pm.max_children = 10 最大可以启动多少进程
pm.start_servers = 5 初始启动多少进程(默认数值推荐为最小备用+(最大备用-最小备用)/2)
pm.min_spare_servers = 2 最少备用的进程数
pm.max_spare_servers = 10 最大备用的进程数
pm.max_requests = 500 到达多少请求后自动结束进程
rlimit_files = 1024 一次请求的最大字节数
最后将php-fpm并加入自启动
systemctl enable php-fpm重启nginx和php-fpm:
systemctl restart php-fpm
systemctl restart nginx
三、typecho的安装
1.获取typecho安装包
两种方式,直接wget解压拷贝,
或者本地电脑下载后上传到vps,看你网络和喜好了
1.1-17.10.30-release.tar.gz
附安装包分流,自己注意查毒安全
我们选择vps上直接wget安装,稳妥快捷一点:
cd /home/wwwroot/omo.moe
wget http://typecho.org/downloads/1.1-17.10.30-release.tar.gz
ls看看
1.1-17.10.30-release.tar.gz text
下载ok的话,解压:
tar -xzvf 1.1-17.10.30-release.tar.gzx指extract提取出来
z解压含有gzip属性的文档
v可视化过程view
f指解压后文件夹以filename命名
ls一下,发现解压好了,生成一个新的build文件夹,里面就是安装目录了
我们拷贝到咱们需要建设的网站根目录下来
cp -R build/* ./-Recursive 英[rɪˈkɜ:sɪv]递归传输build文件夹下所有内容,到当前目录 ./指当前目录 ../指上级目录。
如果你不习惯,或者没注意自己目前位置,可以用绝对路径:
cp -R /home/wwwroot/omo.moe/build/* /home/wwwroot/omo.moe/清理掉不需要的文件夹
rm -rf build/同样的,新手慎用这个rm -rf,小心删库跑路,你可以直接xftp删对应文件夹。
2.配置网站数据库
我们可以设置一个typecho的数据库,下面是数据库的基本使用指令:
mysql -u root -p输入安装lnmp时候你的root用户密码,如果之前留空,这里密码默认是root。
进入mysql后,素质三连:
CREATE DATABASE typecho_omo;
CREATE USER omo_admin@localhost IDENTIFIED BY 'password';
GRANT ALL PRIVILEGES ON typecho_omo.* TO omo_admin@localhost IDENTIFIED BY 'password';
创一个叫typecho_omo的数据库,随你喜好取名,取个专用管理用户名omo_admin,自己改成喜欢的,
弄个密码,自己设置,改下password,别直接抄上面的。
注意数据库指令后面的分号。
最后刷新下这些改变和权限:
FLUSH PRIVILEGES;附送:
必须使用一个数据库
use typecho_omo;

update mysql.user set password=PASSWORD('new_password_here') where User='omo_admin';
'new_password_here'这里自己改下单引号里面的密码
刷新下权限
FLUSH PRIVILEGES;
exit;
添加新站点配置:
find / -name nginx.conf找到
查看配置
cat /etc/nginx/nginx.conf里面是否包括下面这行,一般是有的,如果没有,则加上
include /etc/nginx/conf.d/*.conf;然后在 /etc/nginx/conf.d/目录下,创建对应域名网站的配置文件,根据默认文件修改获得。
touch /etc/nginx/conf.d/omo.moe.conf3.设定站点配置文件
如果正规做站,考虑上传附件限制,nginx咱们站点配置里可以在server location http任何一个框里加入:
client_max_body_size 8888mserver {
listen 80;
server_name omo.moe;
listen [::]:80 default_server;#ipv6的放着无所谓,也可以注释掉
root /home/wwwroot/omo.moe;#自己改成自己网站的路径
index index.html index.htm index.php;
#charset koi8-r;
access_log /var/log/nginx/omo.moe.access.log main;#记住自己的log文件目录,也可自己设置
location / {
index index.html index.php;
if (-f $request_filename/index.html) {
rewrite (.*) $1/index.html break;
}
if (-f $request_filename/index.php) {
rewrite (.*) $1/index.php;
}
if (!-f $request_filename) {
rewrite (.*) /index.php;
}
}
error_page 404 /404.html;
error_page 500 502 503 504 /50x.html;
location = /50x.html {
root /usr/share/nginx/html;
}
#不使用php内置解析,采用nginx正则解析pathinfo配置方案1
#配置方案1 使用nginx模块fastcgi_split_path_info(nginx版本>0.7.31)
location ~ \.php {
fastcgi_pass unix:/var/run/php-fpm/php-fpm.sock;
fastcgi_index index.php;
#先加载默认后解析赋值
include fastcgi_params;
#正则解析路径
fastcgi_split_path_info ^((?U).+\.php)(/?.+)$;
fastcgi_param PATH_INFO $fastcgi_path_info;
fastcgi_param SCRIPT_FILENAME $document_root$fastcgi_script_name;
}
location ~ /.ht {
deny all;
}
location ~ .*\.(gif|jpg|jpeg|png|bmp|swf)$ {
expires 15d;
}
location ~ .*\.(js|css)?$ {
expires 1d;
}
}
#不使用php内置解析,采用nginx正则解析pathinfo配置方案2
#由于nginx内建只读变量$fastcgi_script_name无法赋值,所有通过设置$real_script_name变量来做中间值
location ~ \.php {
try_files $uri =404;
fastcgi_pass unix:/var/run/php-fpm/php-fpm.sock;
fastcgi_index index.php;
#先加载默认后解析赋值
include fastcgi_params;
#正则解析路径
set $path_info "";
set $real_script_name $fastcgi_script_name;
if ($fastcgi_script_name ~ "^(.+?\.php)(/.+)$") {
set $real_script_name $1;
set $path_info $2;
}
fastcgi_param SCRIPT_FILENAME $document_root$fastcgi_script_name;
fastcgi_param SCRIPT_NAME $real_script_name;
fastcgi_param PATH_INFO $path_info;
}如果你已经拿到域名证书并准备全站启用https的话,可以直接参考成品配置如下:
server {
  listen 80;
  server_name www.omo.moe omo.moe;
  return 301 https://omo.moe$request_uri;#所有http网站请求跳转https://omo.moe
}

server {
  listen 443 ssl http2 default_server;
  server_name www.omo.moe;
  return 301 https://omo.moe$request_uri;#www网站跳转无www的
}
server {
  listen 80;
  listen [::]:80 default_server;
  root /home/wwwroot/omo.moe;
  index index.html index.htm index.php;
  #charset koi8-r;
  access_log /var/log/nginx/omo.moe.access.log main;

  listen 443 ssl http2 default_server;
  #ssl on; #新版本nginx无需此命令
  ssl_certificate "/usr/local/cert/omo_moe.crt";#证书路径自己改
  ssl_certificate_key "/usr/local/cert/omo_moe.key";#证书路径自己改
  ssl_session_timeout 10m;
  ssl_protocols TLSv1 TLSv1.1 TLSv1.2;
  ssl_ciphers ECDHE-RSA-AES128-GCM-SHA256:ECDHE:ECDH:AES:HIGH:!NULL:!aNULL:!MD5:!ADH:!RC4;
  ssl_prefer_server_ciphers on;

  error_page 404 /404.html;
  error_page 500 502 503 504 /50x.html;
  location = /50x.html {
    root /usr/share/nginx/html;
  }
  client_max_body_size 8888m;#放宽网页主体大小限制,方便自己上传大文件。

  location / {
    index index.html index.php;
    if (-f $request_filename/index.html) {
      rewrite (.*) $1/index.html break;
    }
    if (-f $request_filename/index.php) {
      rewrite (.*) $1/index.php;
    }
    if (!-f $request_filename) {
      rewrite (.*) /index.php;
    }
  }
  location ~ \.php {
    fastcgi_pass unix:/var/run/php-fpm/php-fpm.sock;
    fastcgi_index index.php;
    include fastcgi_params;
    fastcgi_split_path_info ^((?U).+\.php)(/?.+)$;
    fastcgi_param PATH_INFO $fastcgi_path_info;
    fastcgi_param SCRIPT_FILENAME $document_root$fastcgi_script_name;
  }
  location ~ ^.+\.php {
    fastcgi_split_path_info ^(.+\.php)(.*)$;
    fastcgi_param PATH_INFO $fastcgi_path_info;
    fastcgi_param SCRIPT_FILENAME $document_root$fastcgi_script_name;
    fastcgi_param PATH_TRANSLATED $document_root$fastcgi_path_info;
  }
  location ~ /.ht {
    deny all;
  }
  location ~ .*\.(gif|jpg|jpeg|png|bmp|swf)$ {
    expires 15d;
  }
  location ~ .*\.(js|css)?$ {
    expires 1d;
  }
}
这样我们可以直接通过rclone挂载的网盘恢复文件,如果你需要直接从旧站恢复数据,那么可以忽略后面的全新安装流程,这里演示一下:
1.备份数据库和网站文件
如果你的旧站正在运行,我们先备份下相关文件,如果你也是用typecho的handsome新版主题,请登录你的后台管理关闭handsome插件后再进行备份操作:
使用zip指令压缩下网站用户文件备份至/home/Backup文件夹下:
zip -r /home/Backup/omo_moe_fileData_yy.mm.dd.zip /home/wwwroot/omo.moe/usrroot用户下使用 mysqldump备份对应数据库:
mysqldump -h localhost -u root -p typecho_omo > /home/Backup/omo_moe_yy.mm.dd.sql然后rclone备份至Gdrive网盘:
rclone copy -v --stats 15s --bwlimit 40M /home/Backup/omo_moe_fileData_yy.mm.dd.zip GdriveBackup:Backup
rclone copy -v --stats 15s --bwlimit 40M /home/Backup/omo_moe_yy.mm.dd.sql GdriveBackup:Backup
不需要限速就去掉 --bwlimit 40M
注意zip文件压缩后包括完整的文件路径,即压缩包里面路径是:/home/wwwroot/omo.moe/usr
顺便可以做下网站内容增量备份:
rclone copy -v --stats 15s --bwlimit 40M /home/wwwroot/omo.moe/ GdriveBackup:Backup/omo.moe这个因为Gdrive IO限制,小文件拷贝可能会比较慢,记得在screen里面挂着吧!
2.新站恢复数据流程
rclone下载Gdrive网盘中对应sql数据库文件和网站用户文件zip包:
rclone copy -v --stats 15s --bwlimit 40M GdriveBackup:Backup/omo_moe_fileData_yy.mm.dd.zip /home/Backup/
rclone copy -v --stats 15s --bwlimit 40M GdriveBackup:Backup/omo_moe_yy.mm.dd.sql /home/Backup/
解压导入网站用户文件以及mysqldump恢复数据库文件:
新站的mysql里面创建新的网站数据库:
mysql>create database typecho_omo;新数据库名不需要和旧站一致
mysql>show databases;看一下是否创建成功
我们将旧站数据导入新站的数据库里
首先使用新站的数据库:
mysql>use typecho_omo;
mysql>source /home/Backup/omo_moe_yy.mm.dd.sql;
mysql>show tables;
查看我们旧站的数据表是否全部导入成功:
以 typecho_contents表为例,查看下全部数据是否完整导入:
show full fields from typecho_contents;查阅下文章内容,新旧数据库对比后检查数据条目是否一致:
select text from typecho_contents;顺便可以查看下typecho_comments留言信息是否恢复正确:
show full fields from typecho_comments;
select text from typecho_comments;
注意,typecho后台管理员账号密码也是在这个数据库里面,所以新站的typecho后台管理员沿用这个。
数据库root用户和新建的typecho_omo数据库专用的博客管理用户typecho_admin,则是使用你新站之前刚创建的。
解压usr网站用户文件压缩包:
unzip omo_moe_fileData_yy.mm.dd.zip
\cp -rf /home/Backup/home/* /home
注意路径问题,如果路径没改变则覆盖当前usr默认文件,完毕后
新站就可以开始安装了
3.附:远程获取旧站mysql数据库文件方法
首先登录旧站数据库开启指定用户和指定远程ip(咱们新站的ip地址)访问当地数据库的权限:
grant all privileges on *.* to typecho_admin@'185.186.146.41' identified by "password"
flush privileges;
select host,user,password from user;
可以看见一条新的访问权限
如果要删除此授权,执行:
delete from mysql.user where user='typecho_admin' and host='185.186.146.41';再切换到新站的ssh,ssh里面直接执行
mysqldump -h 103.79.76.41 -u typecho_admin -p typecho_omo > /home/test.sql通过-h旧站ip,访问旧站的typecho数据库,> 指定数据库导出到本地的路径
常用vi编辑指令:
gg回到页首,输入 :.,$d回车,清空文件nginx -s reload或者 systemctl restart nginx重启下nginx。
4.网站域名解析设置
我们新建站点的话,上面的fast-cgi全新配置二选一设置完毕之后,去自己的域名服务商设置两条A解析
一个@头,ip填你的vps给的ip
一个www头,ip同上
等个2-10分钟,记录更新了就可以浏览器输入你自己的域名访问
如果不能访问,关闭你的SELinux:
setenforce 0永久关闭则输入
sed -i '/^SELINUX=/s/enforcing/disabled/' /etc/selinux/config这样重启后也处于disabled状态。
现在就是图形化安装界面了,很简单的
修改项:
数据库默认地址localhost换成内网地址
127.0.0.1
如果你安装的是php7.0以上,请将数据库引擎改为Pdo_Mysql,其他和低版本php没区别数据库用户名,改成刚才设置的
omo_admin
数据库密码,为自己设置的密码
数据库名,刚才设置的:
typecho_omo
填好你的typecho后台管理员信息,提交即可
(如果出现无法创建config.inc.php文件,是因为/home/wwwroot/omo.moe文件夹owner属性权限没改,可以直接用
chown -R nginx:nginx /home/wwwroot/omo.moe改过来,这里,我们在ssh里直接创建新的网站配置文件:
vi config.inc.php查看下typecho网站配置文件位置
我们当前应该还在 /home/wwwroot/omo.moe目录下,不在的话,
cd /home/wwwroot/omo.moe/
vi config.inc.php
粘贴内容
保存
设置完毕后,应该就ok了
发个帖子上个图片测试看看吧!
一些小的设置:
如果之前你未做修改,这里再说一下:
修改上传图片大小限制
find / -name php.ini
vi /etc/php.ini
修改以下三项:
upload_max_filesize = 8000M;
post_max_size = 8000M;
max_execution_time=600;
systemctl restart php-fpmnginx咱们站点配置里加一条,可以在server location http任何一个框里加入:
client_max_body_size 8888m无法上传附件则改下用户组:
chown -R nginx:nginx /home/wwwroot/omo.moe因为之前修改的listen监听用户和用户组是nginx:nignx
把网站所有文件改成nginx用户和nginx用户组,现在应该就可以了
如果你是军哥一键之类的脚本lnmp搭 wordpress,则应该改成www:www
至此,普通搭建就完毕了,接下来我们来申请证书,弄个https玩:
四、Https证书的申请和部署
1.nginx中启用https
第一步在服务器的nginx配置好ssl证书,并启用443端口,vi /etc/nginx/conf.d/omo.moe.conf加入
listen  443 ssl http2 default_server;
listen [::]:443 ssl http2 default_server;
server_name www.omo.moe omo.moe;
root  /home/wwwroot/omo.moe;
ssl on;
ssl_certificate "/usr/local/cert/star.omo.moe.crt";
ssl_certificate_key "/usr/local/cert/star.omo.moe.key";
ssl_session_timeout 10m;
ssl_protocols TLSv1 TLSv1.1 TLSv1.2;
ssl_ciphers  ECDHE-RSA-AES128-GCM-SHA256:ECDHE:ECDH:AES:HIGH:!NULL:!aNULL:!MD5:!ADH:!RC4;
ssl_prefer_server_ciphers on;
加在server 块内普通80端口监听配置下方即可
我们新建一个证书存放路径:
mkdir -p /usr/local/cert/通过sftp 把证书.crt和自己的私钥.key文件传到这个位置
2.泛域名证书申请
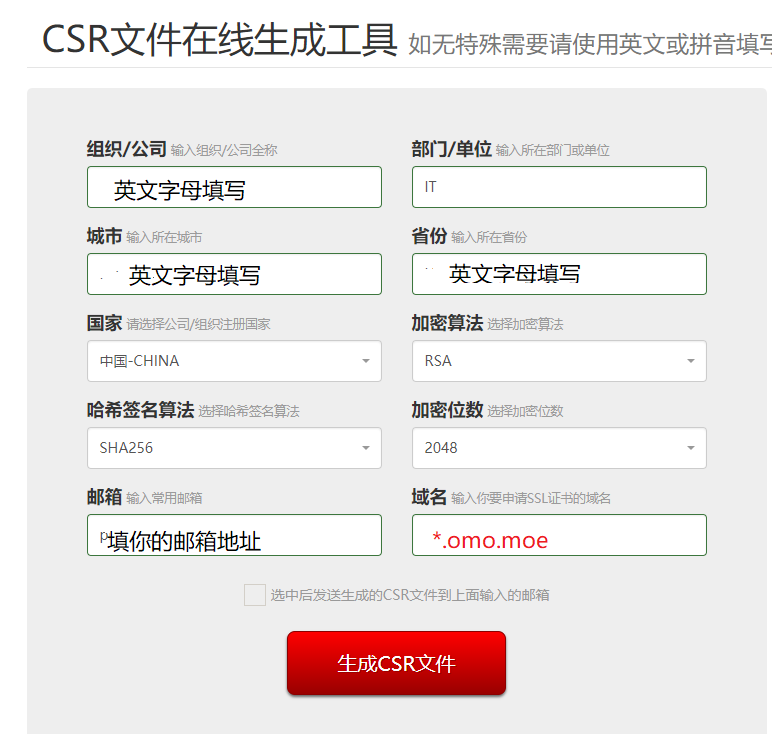
证书申请用的野卡泛域名证书,先填写CSR申请表格,有在线的
https://csr.chinassl.net/generator-csr.html
填写参考:
注意域名前加上*.就是泛域名证书了,你的二级域名可以共用这个证书
注意邮箱要可用,勾选发送,申请信息会发到你的邮箱里
我收藏的两家收费的:
萌咖大佬的杂货铺
vip.cy
或者ssls.com,namecheap,namesilo之类的网站可能有正规的较实惠的证书搞活动价。
按提示申请alphassl 泛域名证书吧!
粘贴刚才邮件里获得的CSR信息,表头和结尾全复制过来
如果有谷歌验证,自行解决
如果你的域名 开启了whoisguard域名隐私保护,可以考虑关闭,不过这玩意要等生效很慢
所以推荐使用域名邮箱认证,免费的域名邮箱申请,阿里云和腾讯都有,百度一下,一般都是给
域名加3个解析:一个mx邮箱解析,一个txt文本指向,一个cname值
加好后,就可以成功获得你的域名对应邮箱后缀服务了
如果你使用office365 e3 MSDN订阅的域名邮箱服务,直接加一个新的成员,设置成需要的用户名,
比如admin@你的域名
webmaster@你的域名之类的
看下拉列表规则
然后自己写信测试看看是不是可用
可用后,就提交申请
等待验证你域名所有人的邮件到达,点击后确认申请信息无误
就确认
一般来说几分钟证书就下发成功了
根据邮件提示(打开邮箱查看),去alphassl网站复制一个通用的intermediate中间人证书
alphassl
与邮件末尾给你颁发的证书公钥部分(intermediate_domain_ca)组合一下,得到完整证书文件,改名为 你的域名.crt
再和你之前拿到的私钥.key文件,都命名ok,准备上传到vps使用
3.typecho后台配置
登录Typecho后台 -> 设置 -> 基本设置 -> 站点地址改成https的域名是必须的。
编辑Typecho站点根目录下的文件config.inc.php加入下面一行配置,否则网站后台还是会调用HTTP资源。
define('__TYPECHO_SECURE__',true);4.全站开启Https访问的nginx配置完善
想要http连接全部跳转到Https的话,继续编辑nginx的配置文件:
vi /etc/nginx/conf.d/omo.moe.conf开头新加一个server 对80端口,也就是http协议做return 301跳转:
server {
  listen 80;
  server_name www.omo.moe omo.moe;
  return 301 https://omo.moe$request_uri;
}
然后如有需要可以将https的www访问301跳转到无www的:
server {
listen 443 ssl http2 default_server;
server_name www.omo.moe;
return 301 https://omo.moe$request_uri;#www网站跳转无www的
}server {
listen 80;
server_name www.omo.moe omo.moe;
return 301 https://omo.moe$request_uri;#所有http网站请求跳转https://omo.moe
}
server {
listen 443 ssl http2 default_server;
server_name www.omo.moe;
return 301 https://omo.moe$request_uri;#www网站跳转无www的
}
server {
listen 80;
listen [::]:80 default_server;
root /home/wwwroot/omo.moe;
index index.html index.htm index.php;
#charset koi8-r;
access_log /var/log/nginx/omo.moe.access.log main;
listen 443 ssl http2 default_server;
#ssl on; #新版本nginx无需此命令
ssl_certificate "/usr/local/cert/omo_moe.crt";
ssl_certificate_key "/usr/local/cert/omo_moe.key";
ssl_session_timeout 10m;
ssl_protocols TLSv1 TLSv1.1 TLSv1.2;
ssl_ciphers ECDHE-RSA-AES128-GCM-SHA256:ECDHE:ECDH:AES:HIGH:!NULL:!aNULL:!MD5:!ADH:!RC4;
ssl_prefer_server_ciphers on;
error_page 404 /404.html;
error_page 500 502 503 504 /50x.html;
location = /50x.html {
root /usr/share/nginx/html;
}
client_max_body_size 8888m;
location / {
index index.html index.php;
if (-f $request_filename/index.html) {
rewrite (.*) $1/index.html break;
}
if (-f $request_filename/index.php) {
rewrite (.*) $1/index.php;
}
if (!-f $request_filename) {
rewrite (.*) /index.php;
}
}
location ~ \.php {
fastcgi_pass unix:/var/run/php-fpm/php-fpm.sock;
fastcgi_index index.php;
include fastcgi_params;
fastcgi_split_path_info ^((?U).+\.php)(/?.+)$;
fastcgi_param PATH_INFO $fastcgi_path_info;
fastcgi_param SCRIPT_FILENAME $document_root$fastcgi_script_name;
}
location ~ ^.+\.php {
fastcgi_split_path_info ^(.+\.php)(.*)$;
fastcgi_param PATH_INFO $fastcgi_path_info;
fastcgi_param SCRIPT_FILENAME $document_root$fastcgi_script_name;
fastcgi_param PATH_TRANSLATED $document_root$fastcgi_path_info;
}
location ~ /.ht {
deny all;
}
location ~ .*\.(gif|jpg|jpeg|png|bmp|swf)$ {
expires 15d;
}
location ~ .*\.(js|css)?$ {
expires 1d;
}
}重写下location ~ ./php{ 的伪静态规则,让文章页前面的index.php也隐藏起来:
location / {
index index.html index.php;
if (-f $request_filename/index.html) {
rewrite (.*) $1/index.html break;
}
if (-f $request_filename/index.php) {
rewrite (.*) $1/index.php;
}
if (!-f $request_filename) {
rewrite (.*) /index.php;
}替换之前的!e $request_filename段落,
再完善一下php文件的匹配规则:添加:
location ~ ^.+.php {
fastcgi_split_path_info ^(.+\.php)(.*)$;
fastcgi_param PATH_INFO $fastcgi_path_info;
fastcgi_param SCRIPT_FILENAME $document_root$fastcgi_script_name;
fastcgi_param PATH_TRANSLATED $document_root$fastcgi_path_info;
}
最后成品参考:
server {
listen 80;
server_name www.omo.moe omo.moe;
return 301 https://omo.moe$request_uri;
}
server {
listen 443 ssl http2 default_server;
server_name www.omo.moe;
return 301 https://omo.moe$request_uri;
}
server {
listen 80;
listen [::]:80 default_server;
root /home/wwwroot/omo.moe;
index index.html index.htm index.php;
#charset koi8-r;
access_log /var/log/nginx/omo.moe.access.log main;

listen 443 ssl http2 default_server;
#ssl on;
ssl_certificate "/usr/local/cert/omo_moe.crt";
ssl_certificate_key "/usr/local/cert/omo_moe.key";
ssl_session_timeout 10m;
ssl_protocols TLSv1 TLSv1.1 TLSv1.2;
ssl_ciphers ECDHE-RSA-AES128-GCM-SHA256:ECDHE:ECDH:AES:HIGH:!NULL:!aNULL:!MD5:!ADH:!RC4;
ssl_prefer_server_ciphers on;

error_page 404 /404.html;
error_page 500 502 503 504 /50x.html;
location = /50x.html {
root /usr/share/nginx/html;
}
client_max_body_size 8888m;
location / {
index index.html index.php;
if (-f $request_filename/index.html) {
rewrite (.*) $1/index.html break;
}
if (-f $request_filename/index.php) {
rewrite (.*) $1/index.php;
}
if (!-f $request_filename) {
rewrite (.*) /index.php;
}
}
location ~ \.php {
fastcgi_pass unix:/var/run/php-fpm/php-fpm.sock;
fastcgi_index index.php;
include fastcgi_params;
fastcgi_split_path_info ^((?U).+\.php)(/?.+)$;
fastcgi_param PATH_INFO $fastcgi_path_info;
fastcgi_param SCRIPT_FILENAME $document_root$fastcgi_script_name;
}
location ~ ^.+\.php {
fastcgi_split_path_info ^(.+\.php)(.*)$;
fastcgi_param PATH_INFO $fastcgi_path_info;
fastcgi_param SCRIPT_FILENAME $document_root$fastcgi_script_name;
fastcgi_param PATH_TRANSLATED $document_root$fastcgi_path_info;
}
location ~ /.ht {
deny all;
}
location ~ .*\.(gif|jpg|jpeg|png|bmp|swf)$ {
expires 15d;
}
location ~ .*\.(js|css)?$ {
expires 1d;
}
}
需要注意的是,原监听80端口的server框里,务必要有一个root 路径,以便那里面的location fastcgi_param
下的$document_root变量能获取到具体的路径,否则会导致
No input file specified.
设置好以后所有的http请求会重定向到https
可以测试下是否正确:
nginx -t根据错误提示自行修正。
最后重启下:
nginx -s reload新的配置就生效了,Https全站启动完成~
5.handsome主题的上传和插件启用
本地解压主题包handsome主题,整个主题文件夹上传到
/home/wwwroot/omo.moe/usr/themes
links插件上传到
/home/wwwroot/omo.moe/usr/plugins
然后登录typecho后台,设置links插件启用,应该就可以正式使用你的typecho博客了。
五、防火墙的基本配置使用
其实到目前为止,你的vps已经差不多设置完毕了,网站一般也没啥问题了,不过如果你想定制化你的防火墙,方便以后其他工具的安装和端口放行,那么可以熟悉下firewalld的使用:
咱们centos 7默认是安装了firewall的,如果你是centos6,喜欢iptables的请继续
firewall-cmd --state查看状态,
没安装的直接安
yum install firewalld安装的更新下:
yum update firewalld先更新下firewalld到最新
启动: systemctl start firewalld
请注意,firewalld防火墙默认只启动22端口的ssh,你如果ssh端口改过了,请务必小心,
查看防火墙规则
firewall-cmd --list-all会发现,在咱们默认的防火墙配置中仅开启了
services: ssh dhcpv6-client
ssh和dhcpv6-client两个服务,网站服务http 80端口
https 443端口是不可用的,
打开你的网站:
会提示502错误,无法访问的
别慌
我们添加http,https建站服务即可:
firewall-cmd --permanent --add-service=http
firewall-cmd --permanent --add-service=https
再查看下就ok了
firewall-cmd --reload
firewall-cmd --list-all
查看状态: systemctl status firewalld
停止: systemctl disable firewalld
禁用: systemctl stop firewalld
最后
我们来演示下开启指定端口:
systemctl status firewalld
firewall-cmd --list-all
firewall-cmd --permanent --add-port=12345/tcp
firewall-cmd --permanent --add-port=12345/udp
firewall-cmd --reload
firewall-cmd --list-all
最后的最后,感谢您的查阅,希望能对您有所帮助!

6 comments
非常好建站教程,稍微改一下就能在debian用了٩(ˊᗜˋ*)و
非常详细的教程,超赞!
我那33刀年BWG想用宝塔来安。可行?
宝塔没测过,建议加点swap看看,我是直接安装的typecho+v2ray,内存占用100M多点和100M的swap
按照你这个安装下来要多久
因为不是编译安装,所以正常性能vps只需要几分钟就能安装完毕,花费的时间主要是指令输入和设置修改方面,看熟练程度,一般半小时内可以搞定。