
1.linux系统安装和ssh工具远程访问vps配置
https://www.netsarang.com/en/xshell/
先下载xshell用来ssh远程访问你的远程服务器(VPS)
选择download进入下载页面,最右边有个个人免费版本https://www.netsarang.com/en/free-for-home-school/
填写个人信息,邮箱,等待下载地址通过邮件发给你。
注意授权是非商用,新版可以无限窗口了以及同窗口只能开4个会话标签,多的链接会新建页面进行访问。
先进入vps服务器运营商的后台进行重装系统:
https://virmach.com/
右上角login登录,然后管理你的vps,选择进入后台面板: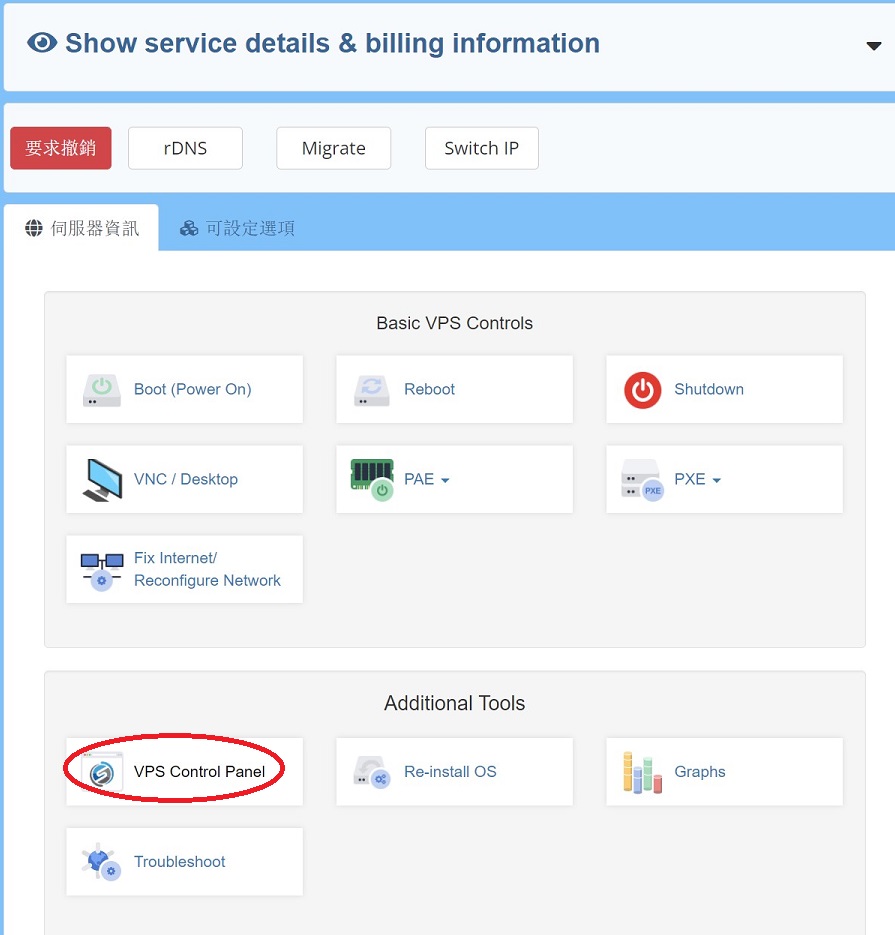
后台找到reinstall重装系统按钮,选择合适的操作系统进行重装: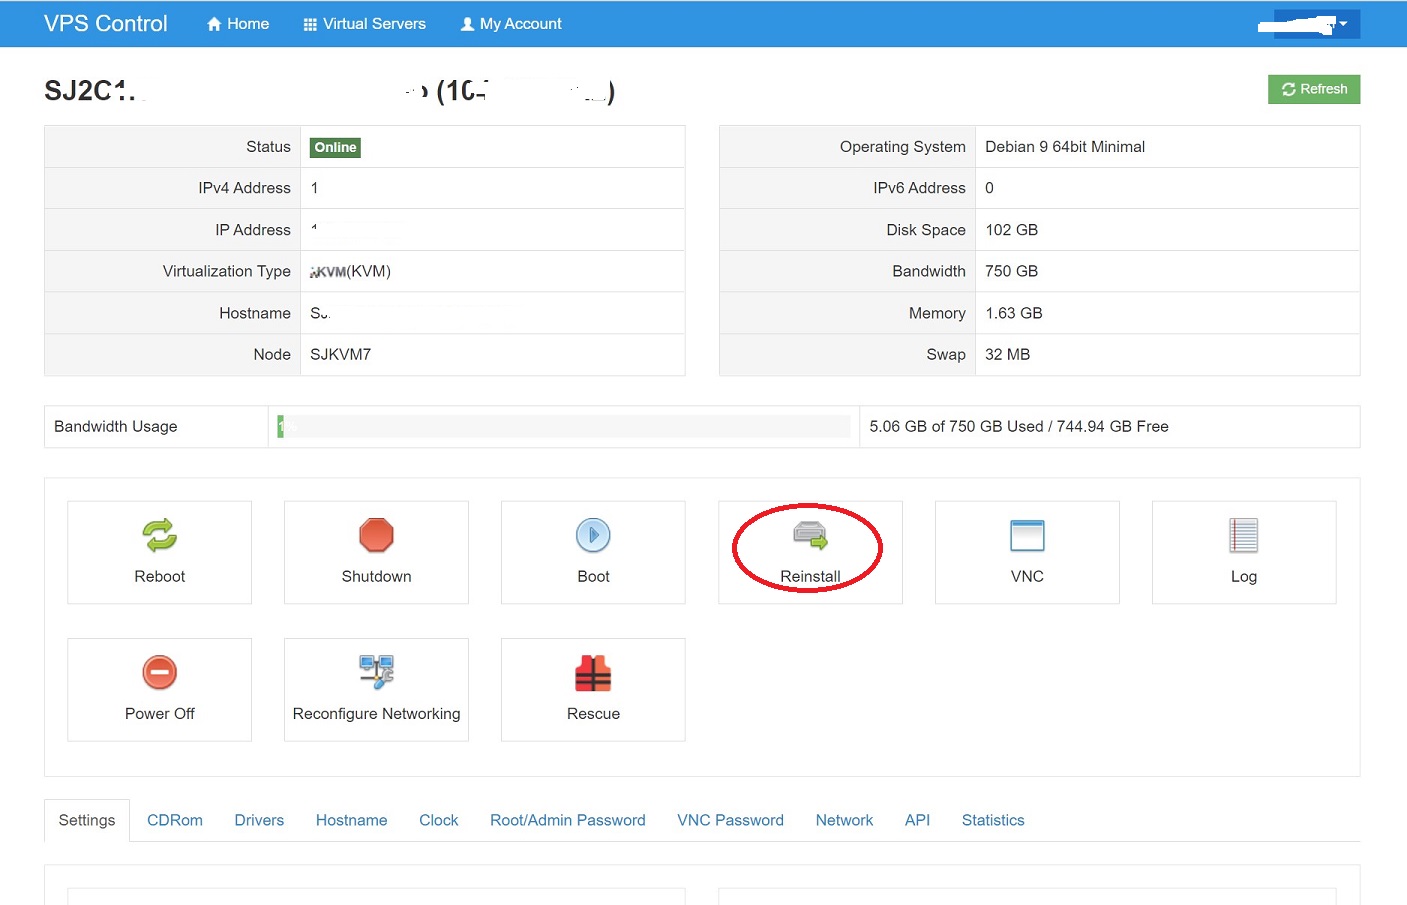
一般选择Debian 9/10, 或者centos 7都是可以的,确定重装,记录下页面给你的ssh访问密码,用户名则是默认的root用户
一般5分钟后系统就安装好了,使用xshell通过ssh登录访问你的vps,新建会话如下:
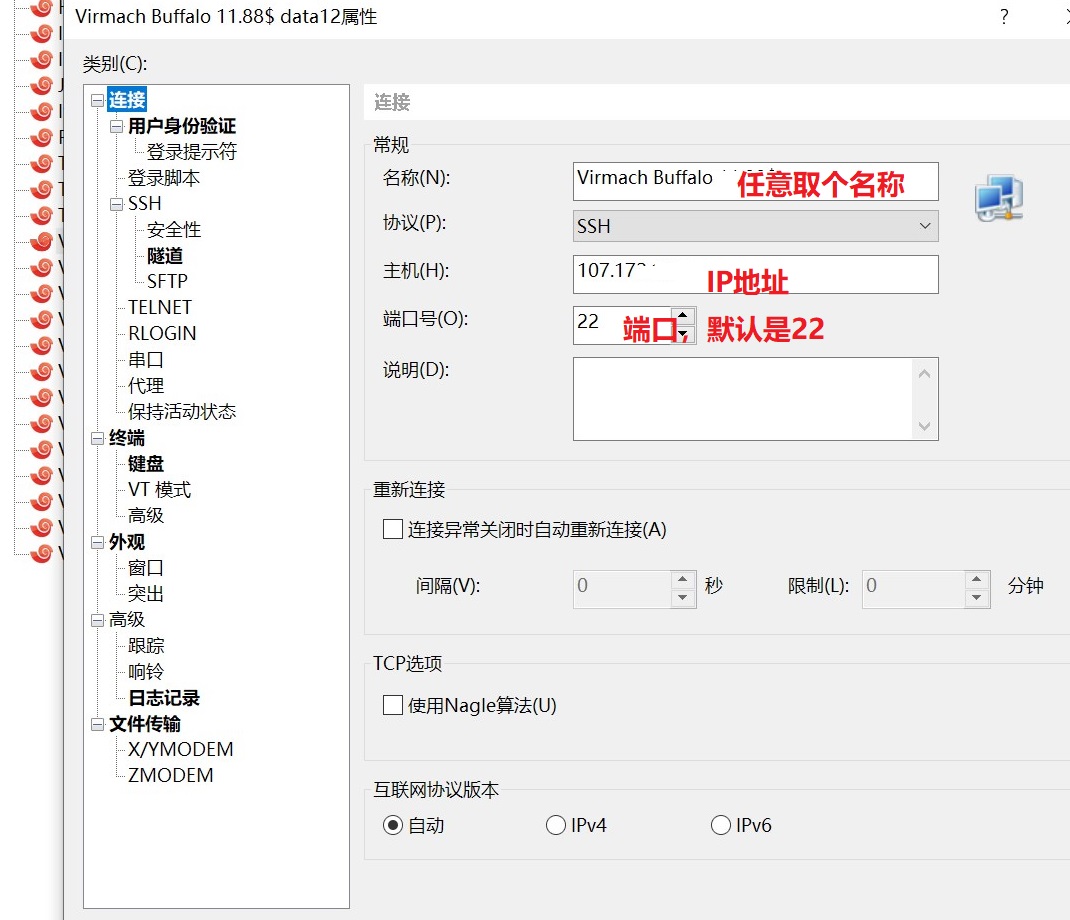
在用户身份验证列表输入用户名root以及刚才后台重装系统得到的临时密码,
勾选下面验证方式password即可,因为马上就要dd windows系统了,这个不改密码没问题的,只是临时用一下罢了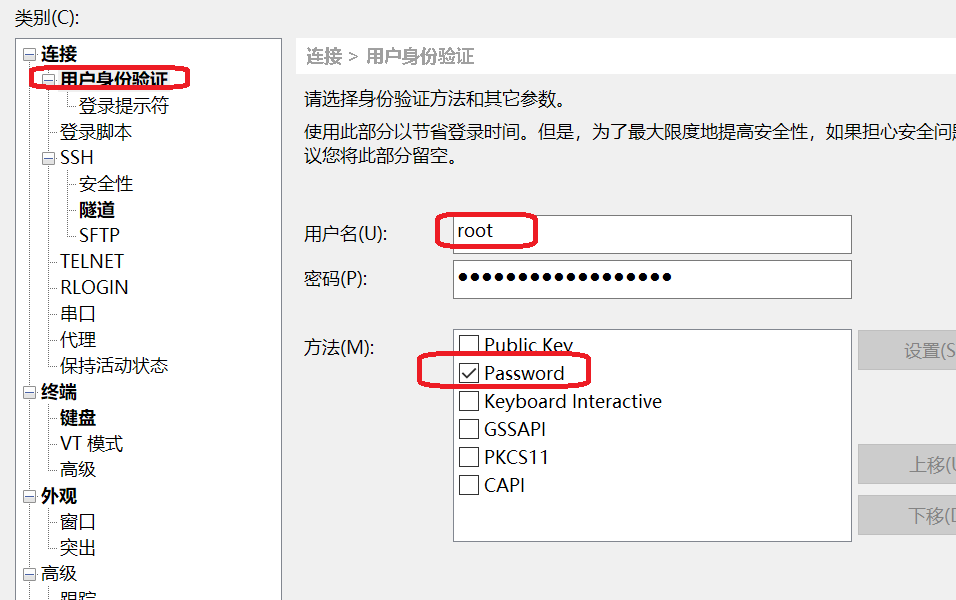
有的服务商启动方式是UEFI而非传统BIOS启动,那么你可以通过以下指令查询:
[ -d /sys/firmware/efi ] && echo UEFI || echo BIOS自行制作或者找到对应启动模式的dd包即可进行下一步安装操作。
2.DD安装windows系统
提供常见的三位大佬dd脚本供选择:
1.CXThhhhh大佬的脚本:
wget --no-check-certificate -qO ~/Network-Reinstall-System-Modify.sh 'https://www.cxthhhhh.com/CXT-Library/Network-Reinstall-System-Modify/Network-Reinstall-System-Modify.sh' && chmod a+x ~/Network-Reinstall-System-Modify.sh使用脚本作者自带的镜像进行安装:
bash ~/Network-Reinstall-System-Modify.sh选择需要的镜像序号即可
如果需要指定安装自己的系统镜像则使用以下指令,直链系统镜像地址自己处理:
bash ~/Network-Reinstall-System-Modify.sh -DD "[Windows dd包直连地址]"2.Nat.ee大佬的脚本
wget --no-check-certificate -qO InstallNET.sh 'http://d.nat.ee/sh/InstallNET.sh' && bash InstallNET.sh -dd '[Windows dd包直连地址]'3.Moeclub大佬的脚本
安装依赖
Debian/Ubuntu系统输入:
apt-get install -y xz-utils openssl gawk fileRedHat/CentOS系统输入:
yum install -y xz openssl gawk file如果报错可以尝试更新下系统组件:
Debian/Ubuntu:
apt-get updateRedHat/CentOS:
yum update一键脚本
wget --no-check-certificate -qO InstallNET.sh 'https://moeclub.org/attachment/LinuxShell/InstallNET.sh' && bash InstallNET.sh -dd '[Windows dd包直连地址]'还有别的很多脚本都是可以的
wget --no-check-certificate -O AutoReinstall.sh https://git.io/betags && chmod a+x AutoReinstall.sh && bash AutoReinstall.sh
wget --no-check-certificate -O NewReinstall.sh https://git.io/newbetags && chmod a+x NewReinstall.sh && bash NewReinstall.sh
国内机器或者拉去镜像出错的可以指定mirror为国内镜像源:
bash <(wget --no-check-certificate -qO- 'https://moeclub.org/attachment/LinuxShell/InstallNET.sh') -dd "引号里放dd包直链" --mirror 'http://mirrors.ustc.edu.cn/debian/'
或者这位大佬的也不错~
wget --no-check-certificate -qO InstallNET.sh 'https://sunpma.com/other/oss/InstallNET.sh' && bash InstallNET.sh -dd '[Windows DD包直链地址]'
精简版
#DD Windows Server 2003 32位 精简版 [账户Administrator密码cxthhhhh.com]
wget --no-check-certificate -qO InstallNET.sh 'https://moeclub.org/attachment/LinuxShell/InstallNET.sh' && bash InstallNET.sh -dd 'https://api.moeclub.org/GoogleDrive/1j9ow8dsIA7DucsGpDI-kzJwiNW9kMceT'

#DD Windows Server 2008 R2 64位 精简版 [账户Administrator密码WinSrv2008x64-Chinese]
wget --no-check-certificate -qO InstallNET.sh 'https://moeclub.org/attachment/LinuxShell/InstallNET.sh' && bash InstallNET.sh -dd 'https://api.moeclub.org/GoogleDrive/1DTps9WwC6RZ8szflais8YazpkCVdqdI7'

#DD Windows Server 2012 R2 64位 精简版 [账户Administrator密码WinSrv2012r2x64-Chinese]
wget --no-check-certificate -qO InstallNET.sh 'https://moeclub.org/attachment/LinuxShell/InstallNET.sh' && bash InstallNET.sh -dd 'https://api.moeclub.org/GoogleDrive/1KTzROA2eWTHC8qWUG2Vr-onuRTwaIOSe'

#DD Windows Server 2019 Datacenter 64位 精简版 [账户Administrator密码WinSrv2019dc-Chinese]
wget --no-check-certificate -qO InstallNET.sh 'https://moeclub.org/attachment/LinuxShell/InstallNET.sh' && bash InstallNET.sh -dd 'https://api.moeclub.org/GoogleDrive/1NbOzolHsDGbp3gJ3TeQ9_4qkmSLIuO07'

#DD Windows7 32位 精简版 [账户Administrator密码Windows7x86-Chinese]
wget --no-check-certificate -qO InstallNET.sh 'https://moeclub.org/attachment/LinuxShell/InstallNET.sh' && bash InstallNET.sh -dd 'https://api.moeclub.org/GoogleDrive/15NkZxVdkcx2P9cFez9gxkqVEQksKMrx1'

#DD Windows7 sp1 64位 旗舰精简版 自带IIS [账户Administrator密码www.nat.ee]
wget --no-check-certificate -qO InstallNET.sh 'https://moeclub.org/attachment/LinuxShell/InstallNET.sh' && bash InstallNET.sh -dd 'https://api.moeclub.org/GoogleDrive/1KA9PDH4T2ODbxS97T6MtTk5TwifQQoIp'

#DD Windows7 64位 旗舰精简版 [账户Administrator密码www.nat.ee]
wget --no-check-certificate -qO InstallNET.sh 'https://moeclub.org/attachment/LinuxShell/InstallNET.sh' && bash InstallNET.sh -dd 'https://api.moeclub.org/GoogleDrive/1C9Y0Iu1pGX4-blb_3G49jOqv13Zeka6-'

#DD Windows10 64位 企业精简版 2019LTSC [账户Administrator密码www.nat.ee]
wget --no-check-certificate -qO InstallNET.sh 'https://moeclub.org/attachment/LinuxShell/InstallNET.sh' && bash InstallNET.sh -dd 'https://api.moeclub.org/GoogleDrive/1pUNKV0nQvFXDZYJnfq2FzEfQNCZ3_5g7'
完整版
#DD Windows Server 2012 R2 Datacenter 64位 完整版 [账户administrator密码Password147]
wget --no-check-certificate -qO InstallNET.sh 'https://moeclub.org/attachment/LinuxShell/InstallNET.sh' && bash InstallNET.sh -dd 'https://api.moeclub.org/GoogleDrive/1bfXS59h0y8Ibz5o84DvcBMfqhP0d12Ib'

#DD Windows Server 2016 Datacenter 64位 完整版 [账户administrator密码Password147]
wget --no-check-certificate -qO InstallNET.sh 'https://moeclub.org/attachment/LinuxShell/InstallNET.sh' && bash InstallNET.sh -dd 'https://api.moeclub.org/GoogleDrive/1CElbDjEXrjPIX4GpdRBwRXBWTtSHOwzi'

#DD Windows Server 2019 Datacenter 64位 完整版 [账户administrator密码Password147]
wget --no-check-certificate -qO InstallNET.sh 'https://moeclub.org/attachment/LinuxShell/InstallNET.sh' && bash InstallNET.sh -dd 'https://api.moeclub.org/GoogleDrive/1gRIT702MrVzLr8Bmk8OF-_Ckp02_tOxE'
等待十来分钟或者半小时,按你的网络质量和vps配置,等待下载完毕dd包并开始安装,一切都是自动化
尝试rdp远程桌面访问即可:
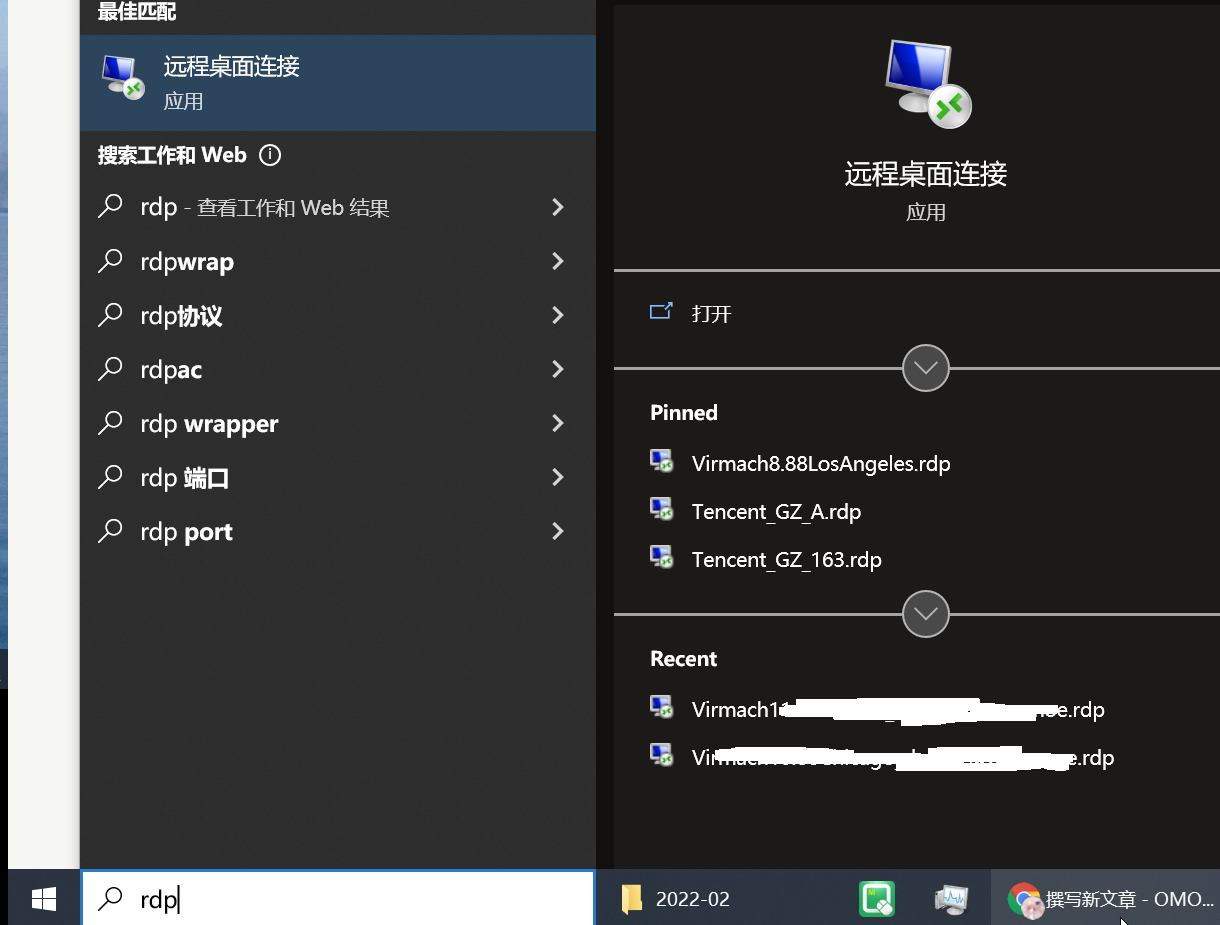
登录成功后记得激活系统:
cmd命令窗口输入以下指令激活win2016 datacenter版本系统:
slmgr /ipk CB7KF-BWN84-R7R2Y-793K2-8XDDG
slmgr /skms kms.moerats.com
slmgr /ato
如果需要查询更多的系统kms激活密钥,可以查阅:
https://www.moerats.com/archives/824/
3.windows系统的服务器基本安全防护
首先,建议修改管理员名称,将默认的administrator改成别的管理员名称
其次,修改系统默认密码为自己的较为复杂的密码
然后推荐修改默认的远程访问端口3389为高位随机端口,推荐10000-65535之间都可以
工具可以点此下载nat.ee大佬写的bat脚本进行密码和端口修改:
tool.cmd
然后,建议安装IPBan等防爆破安全工具:
推荐安装win2016或者win10ltsc等较新的系统,旧版本系统组件的缺少,安装防护需要的配置非常繁琐
win2016使用powershell命令工具输入以下指令即可安装:
[Net.ServicePointManager]::SecurityProtocol = [Net.SecurityProtocolType]::Tls12; iex ((New-Object System.Net.WebClient).DownloadString('https://raw.githubusercontent.com/DigitalRuby/IPBan/master/IPBanCore/Windows/Scripts/install_latest.ps1'))安装完毕后会自动配置相关服务,开启系统登录/注销事件安全审计,并且打开配置文件
ctrl+f查询appsettings项,找到下图两个红线标记位置,一个是失败次数,另一个是封禁时间,默认是5次登录失败,封禁1天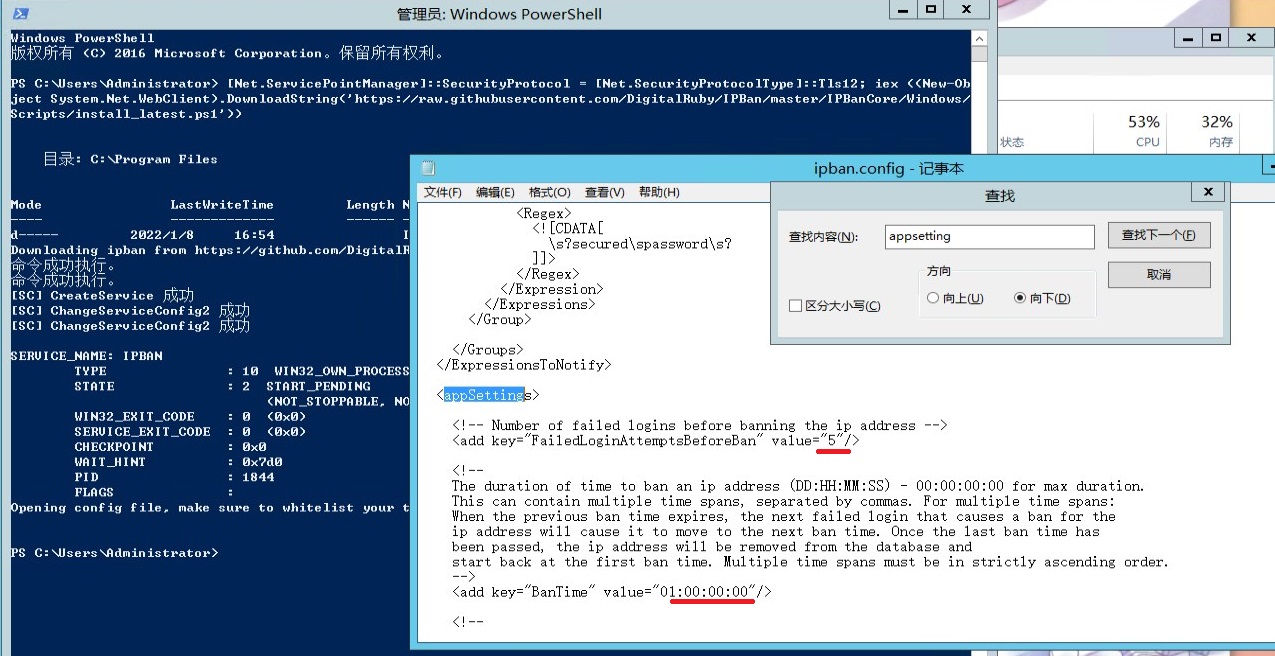
你也可以手动访问C:\ProgramFiles\IPBan\ipban.config文件随时进行调整

2 comments
精力有限,还是建议您到论坛或者找专业的大佬进行咨询答疑,你看我今年连写博客的时间都没了,实在抱歉了。